 | |
CCLA Server Chess | |
| Copyright © 2005– by CCLA. All rights reserved. |
| [top] |
Checkmate |
How to Force Checkmate ! |
Players often complain those theoretical or "textbook" checkmate positions never occur in their own games. If they were common place, chess would be reduced to memorization of a couple dozen positions and the game would become repetitious and boring. What is required is for players to recognize the patterns that will lead to checkmate. When these occur (and they will) players will be able to apply the strategies learned from studying checkmates. "Chess is a game of understanding and not of memory" – Eugene Znosko-Borovsky. |
The following positions have been taken from actual tournament play and illustrate the understanding of checkmate patterns remains a vital part of the player's repertoire. Mating patterns formally identified decades ago are very much alive today. Unlike opening theory, correct endgame technique and the knowledge of checkmating patterns never go out of style! |
Many of the examples below are brief (mate-in-1, 2 or 3 moves, etc.) and can be easily followed. But some involve lengthy analysis and will likely require the reader to set-up the positions/play through the analysis with a gui or a board and men. |
Anastasia's Mate |
Carlsen-Naiditsch Baden Baden 2015 Position after 32. Nxe8 ... |
The world champion has won a piece and further sacrifices by Black will not prevent the inevitable checkmate. |
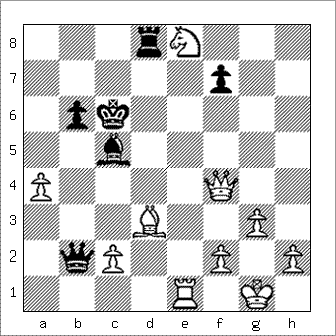 |
| White mates in 10 |
One possibility is 32... Rxd3 33. Qc7+ Kd5 34. Qd7+ Kc4 35. Qxd3+ Kb4 36. Re4+ Ka5 37. Qd5 Qb1+ 38. Kg2 Qf1+ Qb5 ( if 38... Qf1+ 39. Kxf1 b5 40. Qa8+ Kb6 41. a5# ) 39. axb5 Kxb5 40. Nd6+ Ka6 41. Ra4# Anastasia's Mate.) |
No better was 32... Rxe8 33. Rxe8 b5 ( 33... Bxf2+ 34. Kxf2 Kd7 35. Qxf7+ Kc6 36. Rc8+ Kd6 37. Rd8+ Kc6 38. Qd5+ Kc7 39. Qd7# ) 34. axb5+ Qxb5 35. Rc8+ Kd5 36. Bxb5 Ke6 ( 36... Bxf2+ 37. Kxf2 Ke6 38. Re8+ Kd5 39. Qe5# ) 37. Bc4+ Ke7 38. Qxf7+ Kd6 39. Qe6#. |
Karjakin-Metsalu Tallinn (Keres Mem Open) 2001 Position after 25 ... Ned6 |
White sacrifices the queen to produce Anastasia's Mate. |
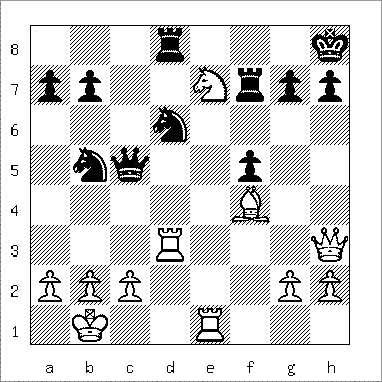 |
| White mates in 2 |
26. Qxh7+ Kxh7 27. Rh3# |
Roth-Rajna Hungary 1975 Position after 16 ... 0-0 ?? |
Carelessly, Black has "castled into it." |
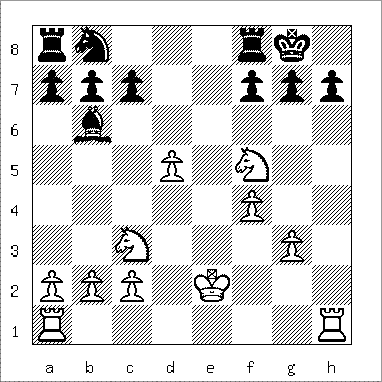 |
| White mates in 3 |
17. Ne7+ Kh8 18. Rxh7+ Kxh7 19. Rh1#, Anastasia's Mate. |
Ueter-Fette Bundesliga 1984 Position after 30. a3 ... |
30. Qxc4, bxc4, ends the immediate mate threat but leaves white considerably down in material. The b4 pawn is en prise with no good way to save it (31. Rbd1 Kb8). |
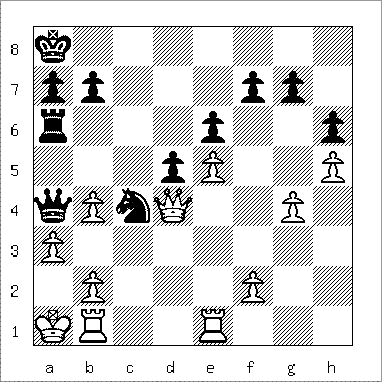 |
| Black mates in 2 |
30... Qxa3+ 31. bxa3 Rxa3#, Anastasia's Mate. |
Anderssen's Mate |
Gunsberg-Schallop London 1886 Position after 23... Qf6 |
All White can do is stall the inevitable. |
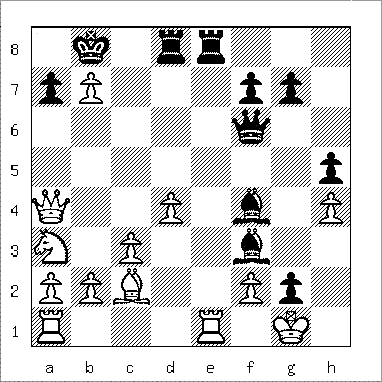 |
| Black mates in 6 |
24.d5 ( 24. Rxe8 loses to ... Bh2+ 25. Kxh2 Qxh4+ 26. Kg1 Qh1# ) Qxh4 25. Qxf4+ Qxf4 26. Rxe8 Rxe8 27. Bf5 Qh4 28. Bh3 Qxh3 29. b4 Qh1#, Anderssen's Mate . |
Ftacik - Vallejo-Pons Baden Baden 2007 Position after 42... Be7 |
White plays a stunning Q sac to bring about checkmate. |
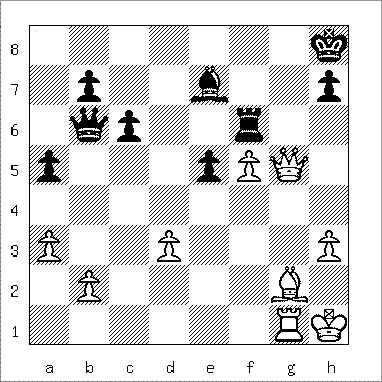 |
| White mates in 3 |
43. Qg8+ Kxg8 44. Bd5+ Kf8 (or ... Kh8) 45. Rg8#, Anderssen's Mate . |
Arabian Mate |
So-Rapport, Wijk an Zee 2017 Position after 46 ... Qxe4? |
Down the equivalent of a minor piece, Black grabs a pawn and anticipates recovering more material with queen checks and captures. |
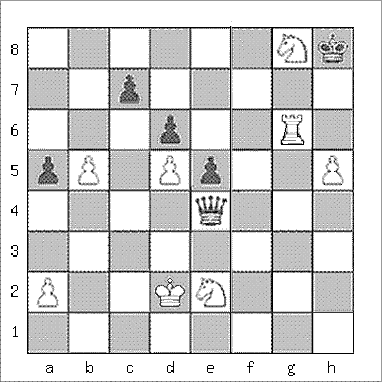 |
| White mates in 7 |
47.Nf6!! A different kind of knight's fork; white threatens to win the queen as well as an Arabian Mate. 47 ... Qb4+ (The unattractive 47...Qxg6 just puts off the inevitable for a few more moves: 48.hxg6 Kg7 49.Ne8+ Kxg6 50.Nxc7 a4 51.b6 e4 52.b7 e3+ 53.Kxe3 Kf5 54.b8=Q Kf6 55.Qg8 Ke7 56.Ne6 Kf6 57.Qg7+ Kf5 58.Ng3#) 48.Ke3 Qc5+ 49.Kf3 e4+ 50.Kg4 Qxd5 51.Nxd5 c6 52.Nf6 cxb5 53.Rg8#. |
Topalov-Giri London 2015 Position after 40 ... Ne4+ |
White is a rook ahead but his king is exposed to attack. A discovered check gets the ball rolling. |
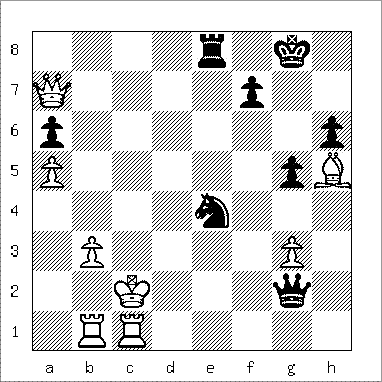 |
| Black mates in 3 |
41.Kd3 Qd2+ 42.Kc4 Rc8+ 43.Qc5 Rxc5#, the "Arabian Mate" on an open board. No better is 41.Qf2 ( 41.Kd1 Qd2# ) Qxf2+ 42.Kd3 Qd2+ 43.Kc4 Rc8#. |
Edwards-Honn Correspondence (CCLA) 2002 Position after 24. Rg2 ... |
White's king is trapped in the corner. |
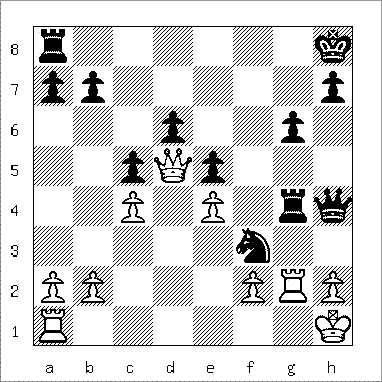 |
| Black mates in 3 |
24... Qh3 25. Rag1 Qxh2+ 1-0. If 26. Rxh2 Rxg1#, the Arabian Mate. Inserting 25. Qxe5+ dxe5 just delays by one move. |
Dart 4.1 - Chess 4.2 (ACM) San Diego 1974 Position after 51... Ke4! |
Mate in the middle of the board. |
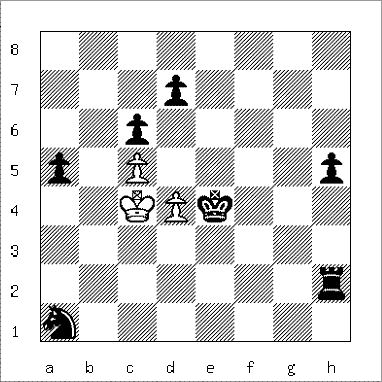 |
| Black mates in 1 |
White has two legal moves = zugzwang. If 52. Kc3 (or 52. d5 Rc2#) Rc2#, the Arabian Mate on an open board. |
Back Rank Mate |
Kahn-Dawber Scarborough (B Tmt.) 1925 Position after 26... Kf8 |
White is Victor Kahn, co-author of the classic "Art of the Checkmate." |
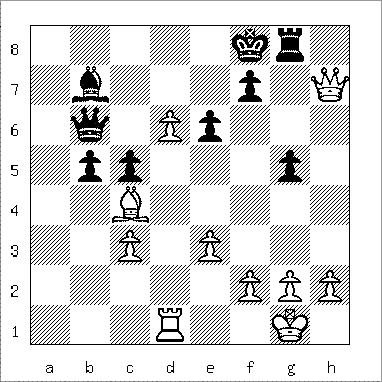 |
| White mates in 9 |
27. Bxe6 Rg7 28. Qh8+ Rg8 29. Qf6 Rg7 30. d7! 1-0 (if 30... Bc6 [30... Qxe6 31.Qd8+ Qe8 32.dxe8=Q#] 31. d8=Q+ Be8 32. Qde7+ Kg8 33. Qxe8+ Kh7 34. Bf5+ Rg6 35. Qeh8# , an impressive Back Rank Checkmate.) |
Harikrishna-Adhiban, Wijk an Zee 2017 Position after 40 ... Kg5? |
Black has "the two bishops" and an extra pawn, but these positional pluses are negated by his exposed king. |
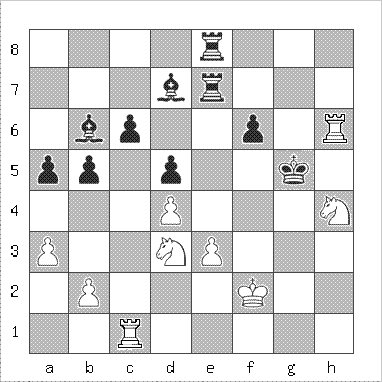 |
| White mates in 4 |
41. Rg6+ Kxh4 (or ... Kh5 42. Nf4+ Kxh4 43. Rh1 Bh3 44. Rxh3#) 42. Rh1+ (a Corridor Mate looms large) Bh3 (forced) 43. Rg3!! is a beautiful zwischenzug. No matter how Black responds, 44. Rhxh3#. |
Naiditsch-Carlsen Baden Baden 2015 Position after 68. g8Q ... |
White wins a classic "pawn race" and a Back Rank Mate results. |
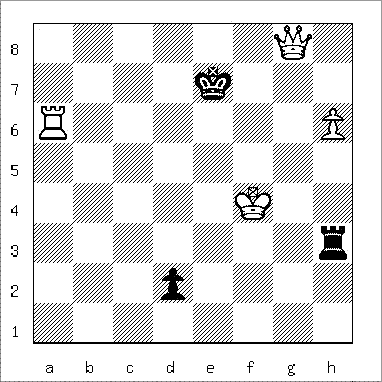 |
| White mates in 6 |
68... Rf3+ (or 68... Rh4+ 69. Kg3 d1Q 70. Qe6+ Kd8 71. Ra8+ Kc7 72. Ra7+ Kb8 73. Qb6+ Kc8 74. Qc7#) 69. Ke4 Re3+ 70. Kxe3 d1Q 71. Qg7+ Ke8 72. Ra8+ Qd8 73. h7 Qxa8 74. h8=Q#. The immediate 68...d1Q transposes to the previous analysis: 69. Qe6+ Kd8 70. Ra8+ Kc7 71. Ra7+ Kb8 72. Qb6+ Kc8 73. Qc7# ) |
Aronian-Rapport Wijk an Zee 2017 Position after 28. Qf1+ ... |
Black's king is in check and confined to the bank rank by the white rook. |
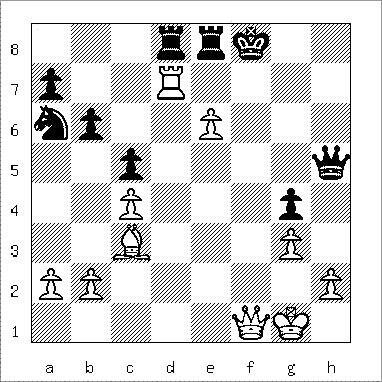 |
| White mates in 4 |
28... Kg8 29. Rg7+ Kh8 30. Rg5+ the king escapes the bank rank but is stuck in the h-file and a Corridor Mate is threatened. 30... Rd4 ( if 30...Kh7 31. Rxh5+ Kg6 [or 31...Kg8 32. Rh8#] 32. Qf7# ) 31. Qf6+ ( if 31. Rxh5+ Kg7 32. Qf7# ) 31... Kh7 32. Qg7#. |
Caruana-Jakovenko Kanty-Mansiysk 2015 Position after 46. Kg4 ... |
Pushing the passer will lead to a disaster for Black: 46... d2? 47. Qf5+ Kg8 48. Qc8+ Kh7 etc. allows white to escape with a draw by repetition. |
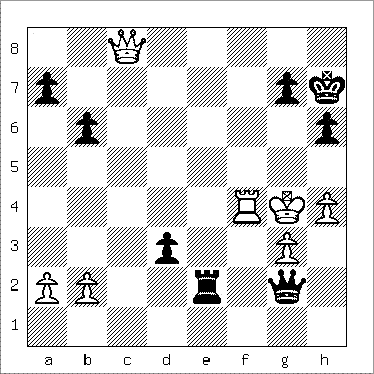 |
| Black mates in 6 |
Instead, 46... h5+ !! 47.Kxh5 ( 47. Kg5 Re5+ 48. Qf5+ [48. Rf5 Qxg3+ 49. Kxh5 g6# ] Rxf5+ 49. Rxf5 [49. Kxf5 Qd5#] Qxg3+ 50. Kxh5 Qg6# ) Qxg3 48. Qg8+ ((a) 48. Qd7 Qg6#; (b) 48. Rg4 g6+ 49. Kg5 Qe5+ 50. Qf5 Qxf5#; (c) 48. Qg4 Re5+ 49. Rf5 g6+ 50. Kg5 Rxf5#.) Kxg8 49. Rf5 Kh7 50. Rg5 g6+ 51. Rxg6 Qxg6#, a Corridor Mate. |
Blackburne's Mate |
Marshall-Short Montreal 1894 Position after 16... Be4 |
Marshall demonstrates the Blackburne theme. |
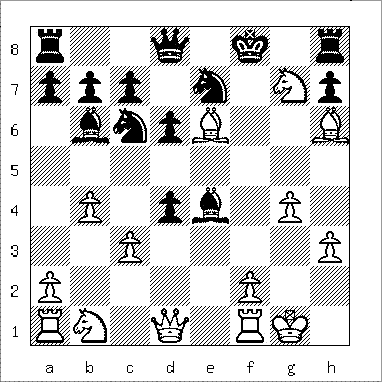 |
| White mates in 2 |
17. Nh5+ Ke8 18. Nf6#, Blackburne's Mate. |
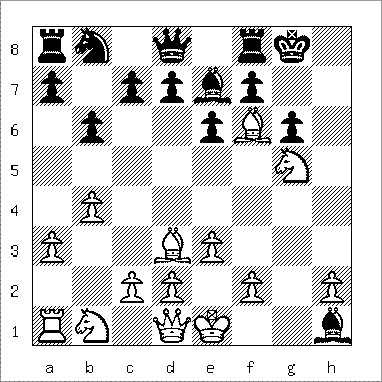
Chernyshov-Lesiak USSR 1969 Position after 10... g6 |
Blackburne's Mate (mate with 2 B's + N pattern) just needs a sac to open lines. |
 |
| White mates in 2 |
11. Qh5! gxh5 (or ... Bxf6 12. Qh7#) 12. Bh7#. |
Boden's Mate |
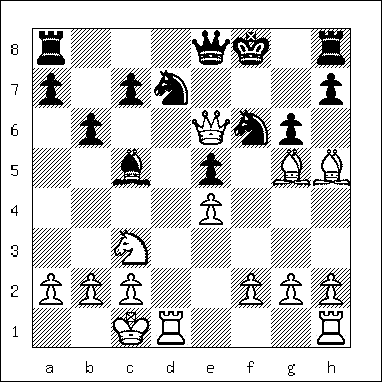
Burrus-Dolan Correspondence (CCLA) 2018 Position after 13... Qe8 ? |
Black's last an unlucky thirteenth. |
 |
| White mates in 1 |
14. Bh6# produces a rare Boden's Mate pattern. |
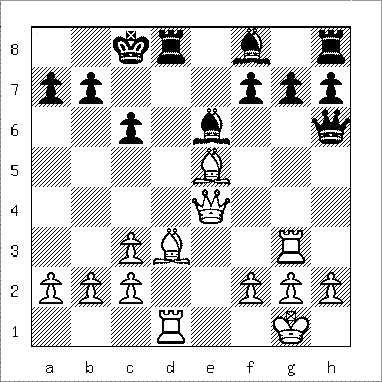
Lasker-Englund Scheveningen 1913 Position after 19... 0-0-0 ??? |
Black castles into disaster. |
 |
| White mates in 2 |
20. Qxc6+ bxc6 21. Ba6# produces a Boden's Mate. |
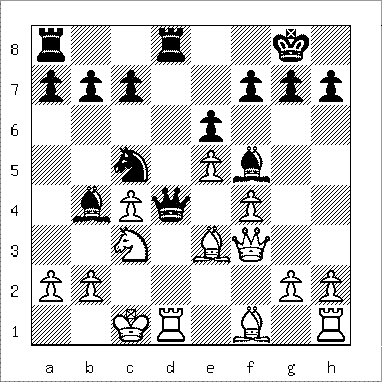
Stroud-Fraser Correspondence (CCCA) 1961 Position after 14. Be3 ... |
Black's queen sacrifice results in a Boden's Mate. |
 |
| Black mates in 2 |
14... Qxc3+ 15. bxc3 Ba3# |
Damiano's Mate |
| Baburin-Adianto Liechtenstein 1993 Position after 21. Be3 ... |
A clearance sac, a zwischenzug and a double rook sac lead to checkmate! |
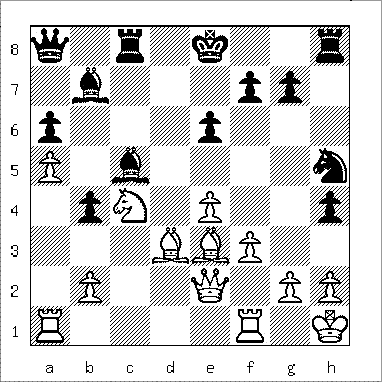 |
| Black mates in 8 |
21... Ng3+ 22. hxg3 hxg3+ 23. Kg1 Ke7! 24. Qe1 Rh1+ 25. Kxh1 Rh8+ 26. Kg1 Rh1+ 27. Kxh1 Qh8+ 28. Kg1 Qh2#, Damiano's Mate. |
Benini-Reggio Rome 1911 Position after 33 ... Rf8 |
Neither king is secure, but white has the initiative. |
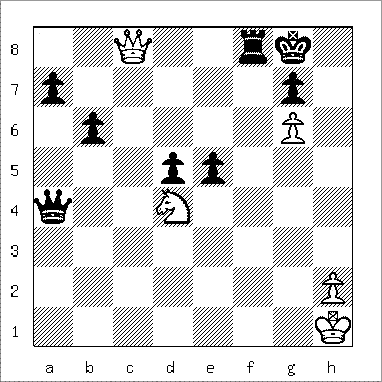 |
| White mates in 3 |
34. Qe6+ Kh8 (if 34... Rf7 35. Qxf7+ Kh8 36. Qf8#) 35. Qh3+ Kg8 36. Qh7#, Damiano's Mate. |
Nimzovich-Albin Vienna 1905 Position after 36. a5 ... |
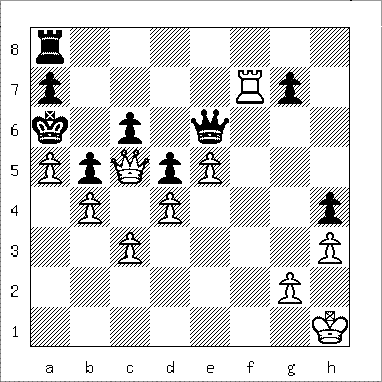 |
| White mates in 2 |
36... Qe8 (if 36... Qxf7 37. Qxc6#) 37. Rxa7+ Rxa7 38. Qb6#, Damiano's Mate pattern. |
Damiano's Bishop |
Aronian-Giri Wijk an Zee 2017 Position after 43. Kg4 ... |
By Qh7#, White threatens a type of Damiano's Bishop Mate as well as Qxg7#. |
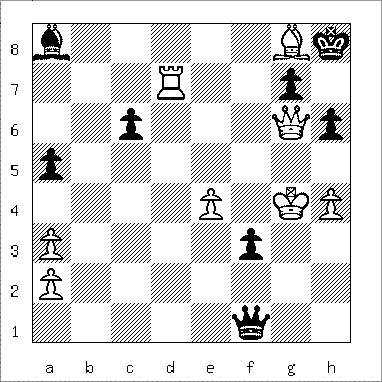 |
| White mates in 6 |
If 43 ... Qg1+ 44.Kh5 Qc5+ ( 44 ...Qxg6+ 45.Kxg6 c5 46.Bd5 Bxd5 47.exd5 f2 48.Rd8# ) 45.Bd5 Qf8 46.Qf7 Qxf7+ 47.Bxf7 c5 48.Rd8+ (or 48.Bg6 Bd5 49.exd5 f2 50.Rd8# ) 48 ...Kh7 49.Bg6# ) |
Deacon-Lowe London 1851 Position after 32... g6 |
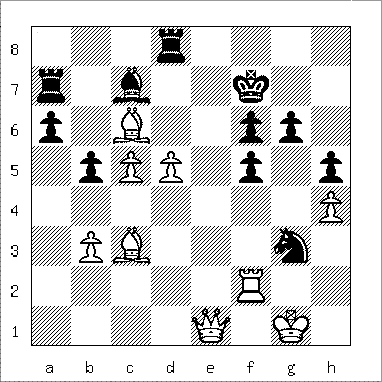 |
| White mates in 3 |
33. Qe6+ Kg7 34. Qxf6+ K-any 35. Qg7#, a Damiano's Bishop Mate. |
Adhiban-Andreikin Wijk an Zee 2017 Position after 46. Bf7+ ... |
Damiano's Bishop Mate is threatened after 46...Kh7 47. Qg8+ Kh6 48. Qg6#. |
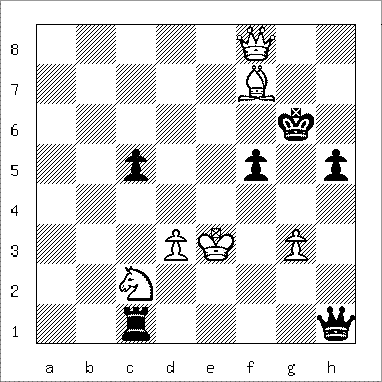 |
| White mates in 3 |
46 ... Kf6 (or 46... Kg5 47. Qg7#.) 47. Bg8+ Kg6 ( if 47... Ke5 48. Qe7#, or if 47... Kg5 48. Qg7# ) 48. Qf7+ Kg5 49. Qg7# . |
David and Goliath |
Glucksberg-Najdorf Warsaw 1929 Position after 21. Kg4 ... |
Mate inflicted by the lowly pawn. |
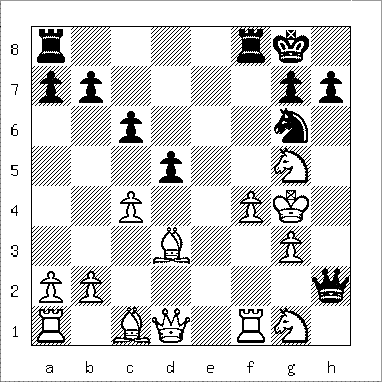 |
| Black mates in 2 |
21... Ne5+ 22. fxe5 (forced) h5#, a David and Goliath Mate. |
Reinisch-Traxler Hostau 1890 Position after 11. Qe2 ... |
White's king exposed on the open board is a recipe for disaster. Note White's spectator (undeveloped) queenside. |
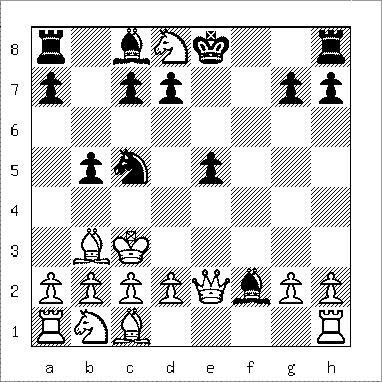 |
| Black mates in 7 |
11... Bd4+ 12. Kb4 a5+ 13. Kxb5 Ba6+ 14. Kxa5 Bd3+ 15. Kb4 Na6+ 16. Ka4 Nb4+ 17. Kb4 c5#, a David and Goliath Mate |
Kapelan-Tarjan Vrsac 1983 Position after 23. Nd2 ... |
|
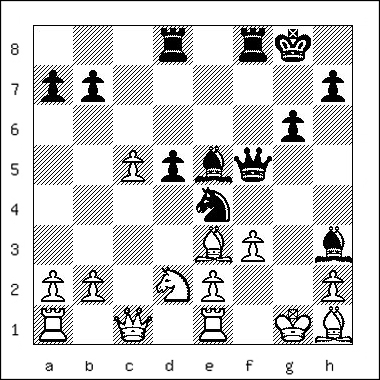 |
| Black mates in 7 |
23. ... Bxh2+ 24.Kxh2 Qe5+ 25.f4 Rxf4 26.Nxe4 Rf2+ 27.Kxh3 Rh2+ 28.Kg4 h5 29.Kf3 dxe4#, a David and Goliath Mate |
Dovetail Mate |
Rapport-Wei, Wijk an Zee 2017 Position after 32 ... Rde8! |
Black threatens 33 ... Bf3+ 34. Rxf3 Re1+ 35. Kg2 h1Q#, a Dovetail Mate. 33. Bxd4 or 33. Rxe8 don't prevent this. If 33. Rxd6+, Kxd6 renews the mate threat. |
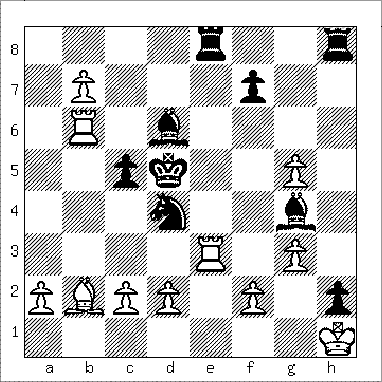 |
| Black mates in 10 |
White's best hope is 33. c4+ Kxc4 34. d3+ Kd5 35. Bc3 (this stops an eventual ... Re1+) Rxe3 36. Rxd6+ (not 36. fxe3 Bf3#) Kxd6 37. b8=Q+ Rxb8 38. Bxd4 cxd4 39. Kxh2 Rh8+ 40. Kg1 Re1+ 41. Kg2 Reh1 42. g6 R8h2#. |
Tullidge-Lampe Melbourne (Australian Ch) 1888 Position after 31... Kh7 |
A "pawnstorm" leads to checkmate in a position rife with mating possibilities. |
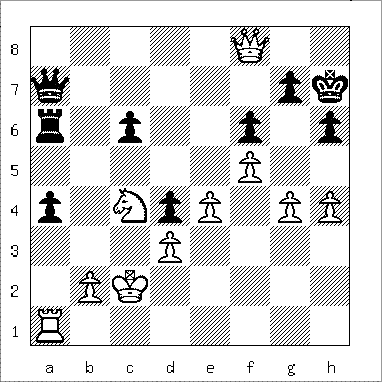 |
| White mates in 5 |
32. g5 fg5 33. hg5 c5 (of course not ... hxg5 34. Rh1#, a corridor mate) 34. g6# (a David & Goliath mate, except for ...) Rxg6 35. fxg6+ Kxg6 36. Qf5#, a Dovetail Mate. |
Blackburne-Green London 1862 Position after 42... Kc5 |
Black has mate on the move, but White gets there first. |
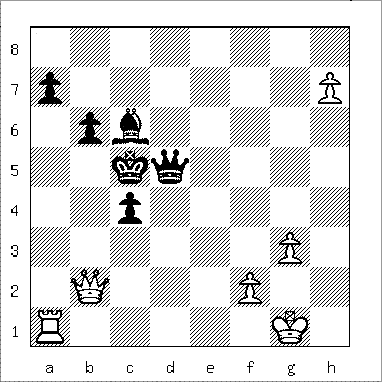 |
| White mates in 2 |
43. Qa3+ Kd4 ( 43...Kb5 44. Rb1# ) 44. Qe3#, a Dovetail Mate. |
Anand-Grischuk Moscow 2004 Position after 26 ... Rg8 |
White has closed the queenside and now strikes on the kingside: a Royal Fork followed by a Rook sac. |
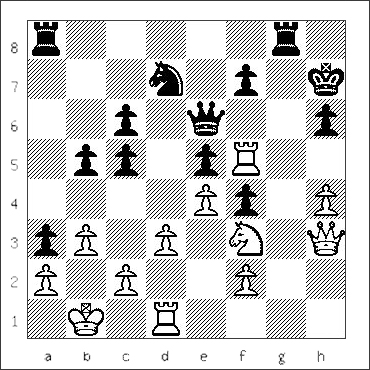 |
| White mates in 4 |
27. Ng5+! hxg5 28. Rxf7+! Qxf7 29. hxg5+ Kg7 30. Qh6# , a Dovetail Mate. |
| [top] |
 |
Epaulette Mate |
Carlsen-Sipke Wijk an Zee 2004 Position after 28. Qf5+ ... |
White anticipates recovering the rook with the more active endgame |
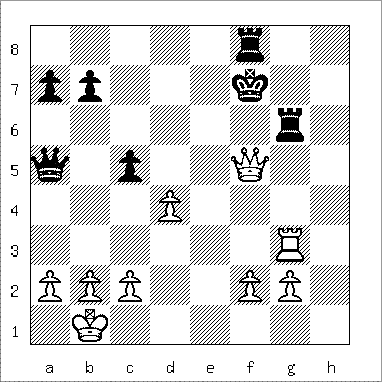 |
| White mates in 15 |
After 28... Rf6 ??? 29. Qd7#, an "Epaulette Mate" pattern on an open board. Black holds out longer after 28... Ke7 29. Re3+ Kd6 30. Qxf8+ Kc7 31. Qf7+ Kc8 32. Qf5+ Kb8 33. Re8+ Kc7 34. Re7+ Kb6 35. Qxg6+ Kb5 36. Rxb7+ Qb6 37. Rxb6+ axb6 38. a4+ Ka6 39. dxc5 Ka7 40. Qxb6+ Ka8 41. Qb5 Ka7 42. c6 Ka8 43. Qb7# ) |
van Wely-Morozevich Wijk an Zee 2001 Position after 20 ... Bd6 |
The castled king's pawn protection has disappeared, inviting disaster. |
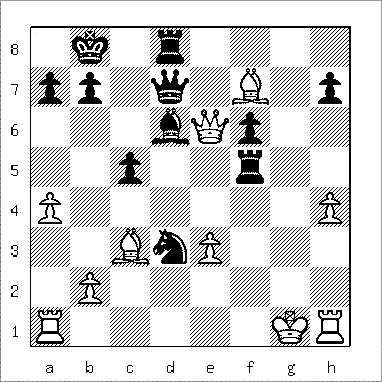 |
| Black mates in 2 |
21. Rf1 ??? Rg8+ 22. Bxg8 Qg7#, the Epaulette Mate. White rejected being a piece down after 21. Qxd7 Rxd7 22. Rf1 Rxf1+ 23. Kxf1 Rxf7 24. Ke2 Ne5 25. Rg1 etc., but the text jumps from the frying pan into the fire!? |
Fool's Mate |
Klip-Bottema Dieren 1990 Position after 2... g5?? |
Yes, these really do occur in tmt. play. |
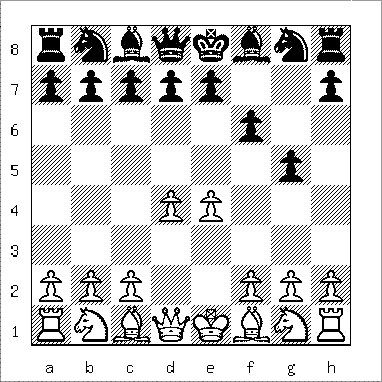 |
| White mates in 1 |
3. Qh5#, a Fool's Mate. |
Damont-NN London (casual game) 1932 Position after 5... fxe6 |
White sacs a center pawn (5. e6) and then the queen to achieve checkmate. |
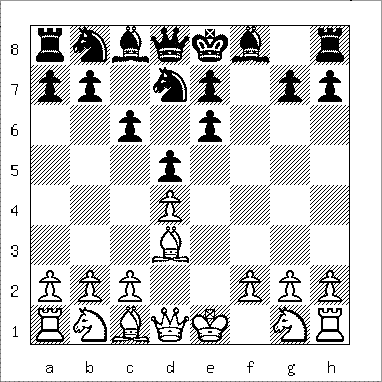 |
| White mates in 3 |
6. Qh5+ g6 7. Qxg6+ (or 7. Bxg6+ hxg6 8. Qxg6#) hxg6 8. Bxg6#, a Fool's Mate . |
Greco's Mate |
Emms-Blees Isle of Man 1996 Position after 29. Qxh7+ ... |
This British GM known for his opening books spots a Queen sac leading to Greco's Mate. |
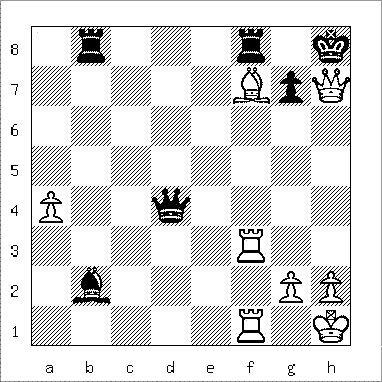 |
| White mates in 2 |
29... Kxh7 30. Rh3+ Qh4 31. Rxh4#. |
Nijboer-Adams Hoogovens 1998 Position after 38. Qc1 ... |
Black sacrifices two pieces to bring about Greco's Mate. |
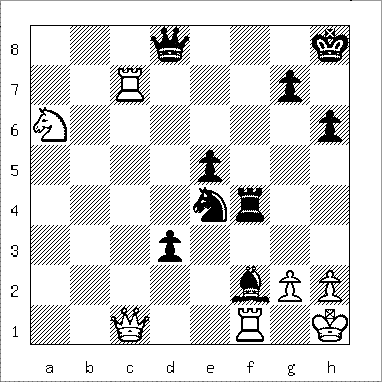 |
| Black mates in 3 |
38 ... Ng3+ 39. hxg3 Qh4+ 40. gxh4 Rxh4#. |
Gueridon Mate |
Nenarokov-Romanovsky Moscow 1927 Position after 48. Rxf2 ... |
This time the essential sacrifice is a rook. |
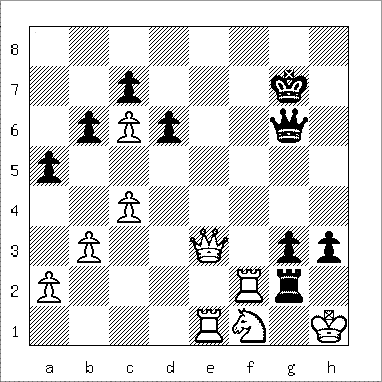 |
| Black mates in 3 |
48... Rg1+ 49. Kxg1 gxf2+ 50. Kxf2 Qg2#, a Gueridon Mate. |
Euwe-Evill Broadstairs 1921 Position after 25 ... Qxc2 ?? |
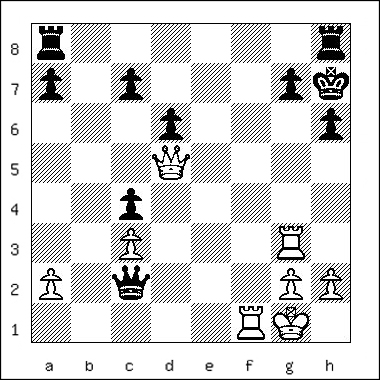 |
| White mates in 2 |
26. Rxg7+! Kxg7 27. Qf7# , a Gueridon Mate. |
Ferrara - N.N. Unknown 1923 Position after 6... Kxf7 |
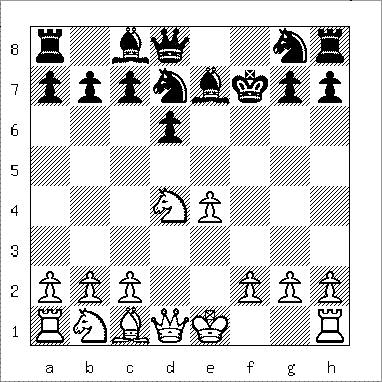 |
| White mates in 3 |
7. Ne6! Kxe6 8. Qd5+ Kf6 9. Qf5#, a Gueridon Mate. |
Hook Mate |
Spreckley-Mongredien Liverpool 1846 Position after 13. Kf2 ... |
The "hook" pattern has been known for a long time. |
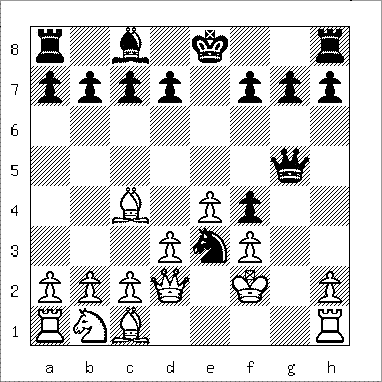 |
| Black mates in 3 |
13... Qg2+ 14. Ke1 Qxh1+ 15. Kf2 Qf1#, a Hook Mate. |
Robey-Anderssen London 1862 Position after 38. Kh2 ... |
A clearance sacrifice opens the way for a Hook Mate. |
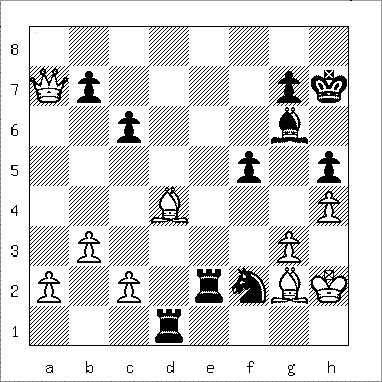 |
| Black mates in 3 |
38... Ng4+ 39. Kh3 Rh1+ 40. Bxh1 Rh2#, a Hook Mate. |
Morphy-Rousseau New Orleans 1849 Position after 13... d5 |
Black's exposed king is doomed. |
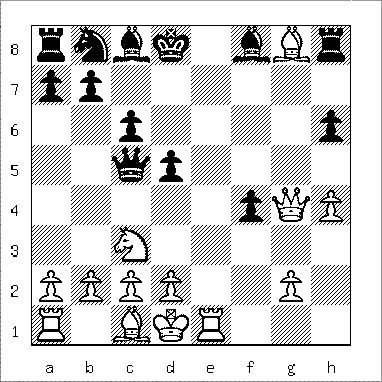 |
| White mates in 4 |
14. Re8+ Kxe8? (14... Kc7 avoids immediate checkmate but loses the queen: 15. Qxc8+ Kb6 16. Na4+ Ka6 17. Nxc5+ etc. ) 15. Qxc8+ Ke7 16. Nxd5+ Kd6 17. Qc7#, a Hook Mate. |
Carlsen-Nakamura Bilbao 2016 Position after 50... Qd6! |
White's king is trapped on the h-file with all black's pieces now poised to attack. |
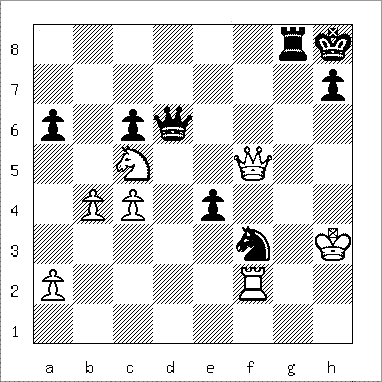 |
| Black mates in 7 |
51.Qg4 (The World Champion sacs his queen to avoid a Corridor Mate) Qh6+ 52. Kg3 Rxg4+ 53. Kxg4 Qg5+ (... but falls prey to a Hook Mate) 54. Kh3 Qh4+ 55. Kg2 Qg4+ 56. Kf1 Qg1+ 57. Ke2 Qe1#. A rare Carlsen defeat. |
Legal's Mate |
Oudhuesden-de Vries Amsterdam 1934 Position after 7... Nxe4 |
White lags in development and his king is exposed. A third knight move is swiftly punished. |
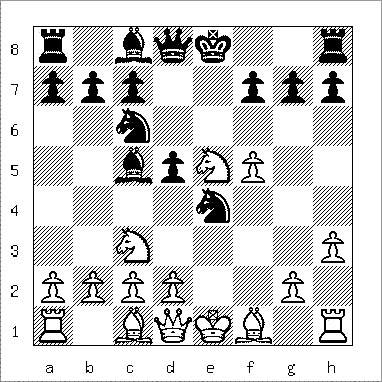 |
| Black mates in 4 |
8. Nf3? Qh4+ 9. Nxh4 (9. Ke2 Qf2+ 10. Kd3 Nb4#) Bf2+ 10. Ke2 Nd4+ 11. Kd3 Nc5#, Legal's Mate. |
Taylor-Dreyer Antwerp 1934 Position after 7. Nxe5 ... |
Black grabs the queen and is immediately punished. |
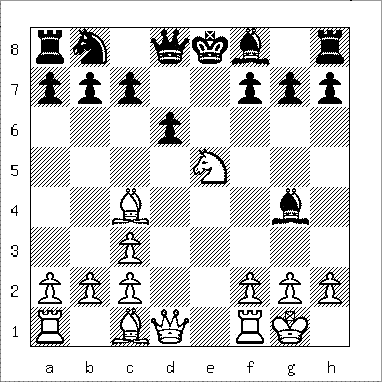 |
| White mates in 2 |
7... Bxd1 ?? 8. Bxf7+ Ke7 9. Bg5#, a Legal's Mate. |
Lolli's Mate |
Blackburne-Steinkuehler Manchester 1871 Position after 28 ... Re5 |
"Pry open the h-file, then sac, sac, mate" said Bobby Fischer, but he might have learned that one from his predecessors. |
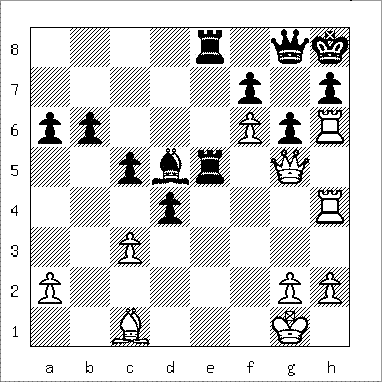 |
| White mates in 5 |
29. Rxh7 Qxh7 30. Rxh7+ Kg8 (if ... Kxh7 31. Qh6+ Kg8 32. Qg7#) 31. Rh8+ Kxh8 32. Qh6+ Kg8 33. Qg7#, Lolli's Mate. |
Menchik-Thomas London 1932 Position after 22 Kb1 ... |
Black plays to avoid Lolli's Mate only to stumble into a Corridor Mate. |
 |
| White mates in 4 |
22 ... Rg8 ( if 22... Ne6 23. dxe6 Rg8 24. hxg6 Rxg6 25. Rxg6 Qxa2+ 26. Nxa2 Rg8 27. Rxg8+ Kxg8 28. Qg7#, Lolli's Mate ) 23. hxg6 fxg6 (23... Qxa2+ 24.Nxa2 Rxg6 25.Rxg6 Ne6 26.dxe6 Rg8 27.Rxg8+ Kxg8 28.Qg7#, Lolli's Mate ) 24. Qxh7+ Black resigns (if ... Kxh7 25.Rh1+ Bh3 26.Rxh3#, an ordinary Corridor Mate. ) |
Max Lange's Mate |
Lange-Hipp Dusseldorf (Kongress) 1864 Position after 34... Rxd5 |
Black escaped one Max Lange Mate, only to fall into another. |
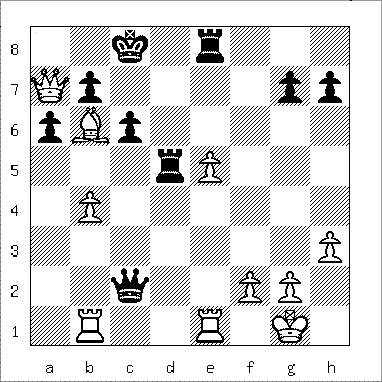 |
| White mates in 3 |
35. e6! (threatens 36. Qa8#) Rxe6 36. Qa8+ Kd7 37. Qd8#, Max Lange Mate. |
Anderssen-Lange Breslau 1859 Position after 17. Qf3 ... |
Black has sacrificed two pieces to engineer a checkmate. |
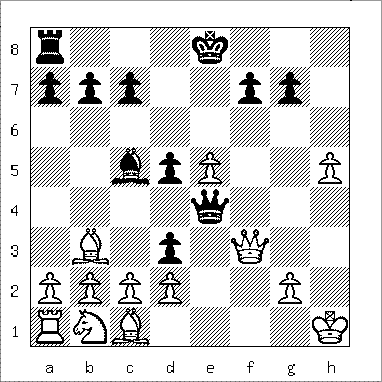 |
| Black mates in 5 |
17... Qh4+ 18. Qh3 Qe1+ 19. Kh2 Bg1+ White resigns (if 20. Kh1 Bf2+ 21. Kh2 Qg1#, the Max Lange Mate.) |
Minor Piece Mate |
Delmar-N.N. New York 1898 Position after 17... Be7 |
Sometimes a Minor Piece Mate occurs when minor pieces coordinate to effect a mate without the aid of queen or rook. |
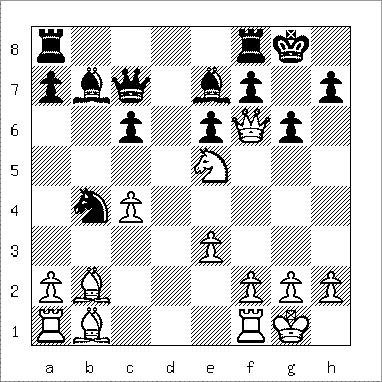 |
| White mates in 3 |
18. Qh8+ Kxh8 19. Nxf7+ Kg8 20. Nh6# |
Formanek-Oshana Chicago (Wamsley Cup) 1970 Position after 17... Ne5 |
The queen sac sets up a minor piece mate. |
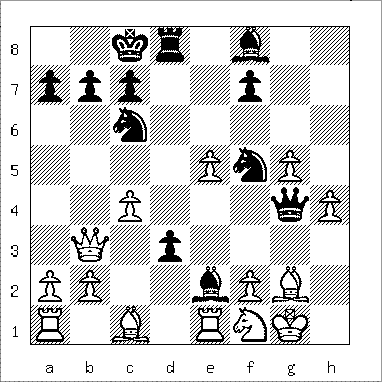 |
| Black mates in 4 |
18. Nh2 Qxh4 19. Bd2 Qxf2+ 0-1 (if 20. Kxf2 Bc5+ 21. Be3 Bxe3#, a clever Minor Piece Mate). |
Morphy's Mate |
Owen-Burn London 1887 Position after 16. Nf6+ ... |
Owen channels Morphy, a knight sac followed by the queen secures the mate. |
 |
| White mates 3 |
16... gxf6 (or 16... Nxf6 17. Qxf6! gxf6 18. Rg1+ Kh8 19. Bxf6#) 17. Rg1+ Kh8 18. Qxf6+ Nxf6 19. Bxf6#, Morphy's Mate . |
Winawer-Shumov St. Petersburg 1875 Position after 20... Rxd5 |
White initiates a windmill attack (22. Rxg7+) followed by checkmate. |
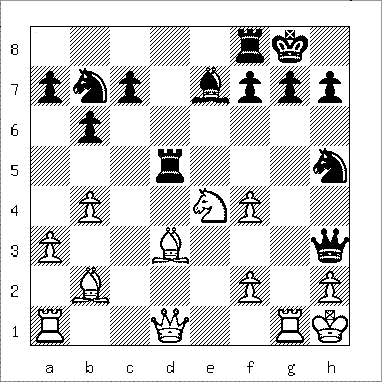 |
| White mates in 11 |
21. Qxh5 Qxh5 22. Rxg7+ Kh8 23. Rxf7+ Kg8 24. Rg7+ Kh8 25. Rxe7+ Kg8 26. Rg1+ 1-0 (if 26... Qg6 27. Rg7+ Qxg7 28. Rxg7+ Kh8 29. Rg1+ Rd4 30. Bxd4+ Rf6 31. Bxf6#), Morphy's Mate . |
Opera Mate |
Pegoraro-Trotto Arvier 2004 Position after 13. Ne6 ... |
If 13... Qxe6 white can try 14. Bc4 and 15. Rhe1. |
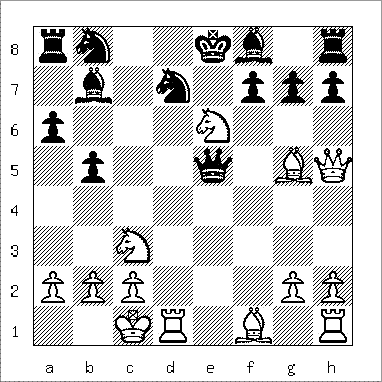 |
| White mates in 4 |
13... g6?14. Nc7+ Qxc7 15. Qe2+ Qe5 (15... Ne5 16. Qxe5+ Qxe5 17. Rd8# transposes) 16. Qxe5+ Nxe5 17. Rd8#, the Opera Mate. |
Schwarz-Labau Germany 1948 Position after 9... Qg6 |
A queen sac to remove the key defender. |
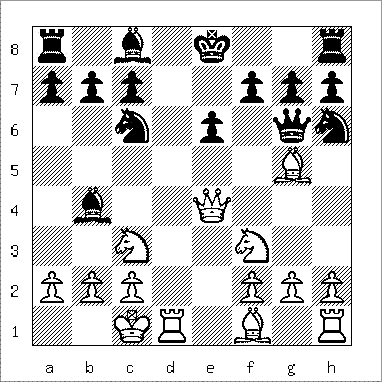 |
| White mates in 2 |
10. Qxc6+ bxc6 11. Rd8#, a textbook Opera Mate. |
Pillsbury's Mate |
Pillsbury-Lee London 1889 Position after 16... Qxg2 |
The original "Pillsbury recipe!" |
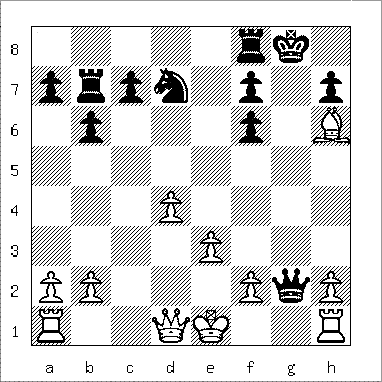 |
| Whites mates in 5 |
17. Qf3 Qxf3 18. Rg1+ Kh8 19. Bg7+ Kg8 20. Bxf6+ Qg4 21. Rxg4#, Pillsbury's Mate. |
Saric-Papadatos Aegina 1994 Position after 13. Qxd6 ... |
A queen exchange that isn't. |
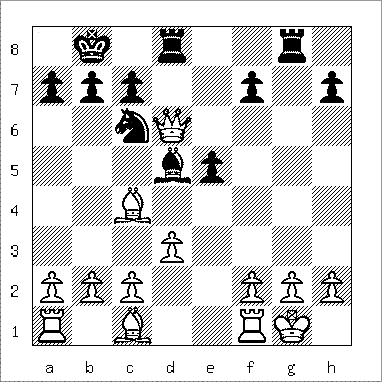 |
| Black mates in 5 |
13... Rxg2+ 14. Kh1 Rg1+ 15. Kxg1 Rg8+ 16. Qg6 Rxg6+ 17. Bg5 Rxg5#, Pillsbury's Mate. |
Reti's Mate |
Caruana – Vachier-LeGrave Wijk an Zee 2015 Position after 35 ... Bf6! |
Black finds a problem-like finish. |
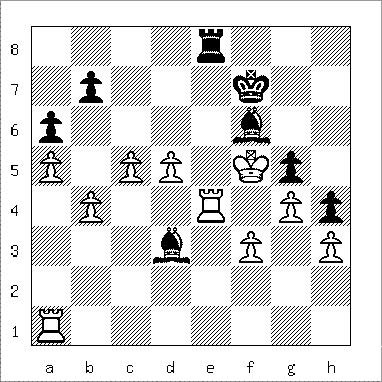 |
| Black mates in 1 |
If 36. Re1 Re5#, or if 36. f4 (to stop ... Re5#) then ... Bxe4#, "Reti's Mate" pattern. |
Garfinkel-Wren Buffalo 1933 Position after 20. Qxf7 ... |
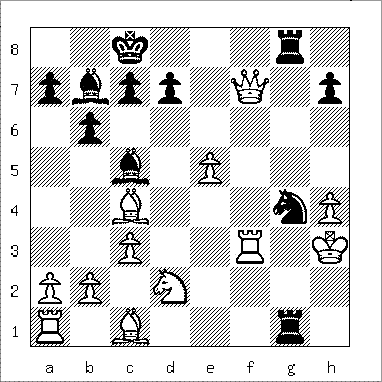 |
| Black mates in 3 |
20... Nf2+ 21. Rxf2 Rh1+ 22. Rh2 Bg2#, "Reti's Mate". |
Scholar's Mate |
Creighton-Rangnow Omaha (50th US Open) 1949 Position after 6... Be7 |
Black's weak f7 square invites an attack. |
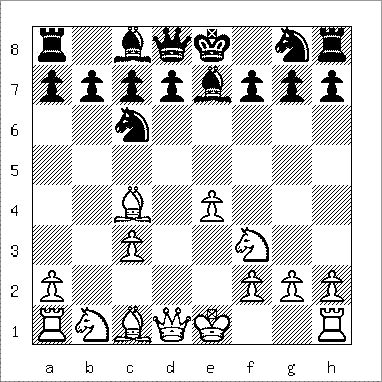 |
| White mates in 3 |
7. Qd5! d6? (7... Nh6 8. Bxh6 0-0 9. Be3 avoids mate but loses a piece) 8. Qf7+ Kd7 9. Be6#, a Scholar's Mate pattern. |
Meyer-Newcomb Junior Tmt. 1952 Position after 3 Qh5 ... |
Black must play 3 ... Qe7 to defend against both 4. Qxf7# and 4. Qxe5+. |
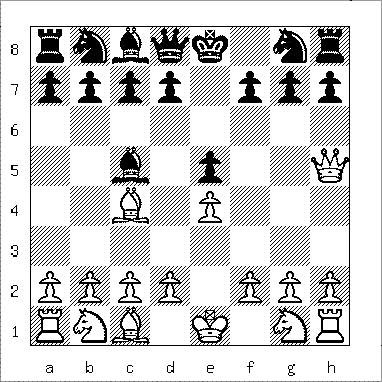 |
| White mates in 4 |
3... g6?? 4. Qxe5+ Ne7 5. Qxh8+ Ng8 6. Qxg8+ Bf8 7. Qf7#, a Scholar's Mate. |
Smothered Mate |
Bischoff-Mueller Hockendorf (75th Ger Ch) 2004 Position after 31... fxe6 |
White now "smothers" the black king. |
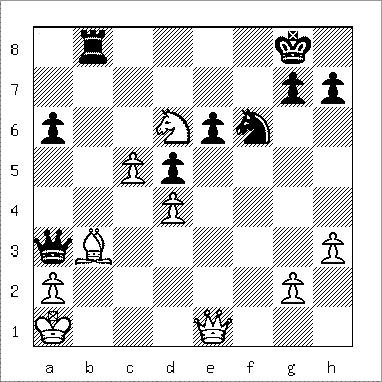 |
| White mates in 5 |
32. Qxe6+ Kh8 33. Nf7+ Kg8 34. Nh6+ Kh8 35. Qg8+ Nxg8 (or ... Rxg8) 36. Nf7#, a Smothered Mate |
Henricksen-Pedersen Bronshoj 1937 Position after 6... Qe7 |
A known trap in the Budapest Defense claims another victim. |
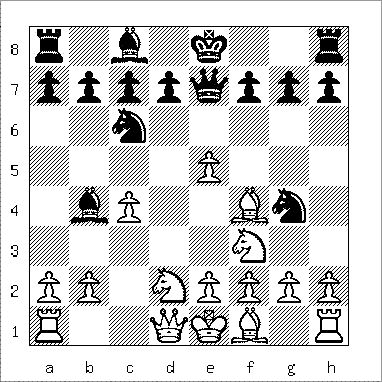 |
| Black mates in 2 |
7. a3 Ngxe5 8. ab4?? (White should play 8. e3) Nd3#, a Smothered Mate in the early opening. |
Bird - NN Great Britain (simul) 1869 Position after 11... Nf6 ?? |
Well-known trap in the King's Gambit Accepted forces mate. |
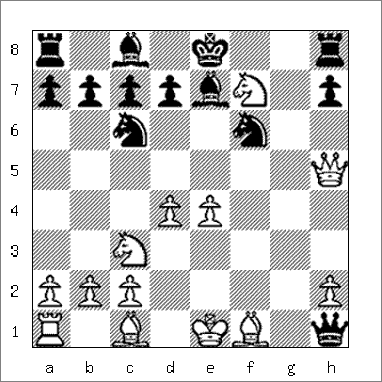 |
| White mates in 3 |
12. Nd6++ Kd8 (12... Kf8 13. Qf7#)13. Qe8+ Rxe8 (or 13... Nxe8) 14. Nf7#, a Smothered Mate in the early middlegame. |
Oneill-Regan Correspondence (CCLA) 2017 Position after 13... Nf6 ?? |
White reprises the well-known mate (Bird vs amateur) featured above. |
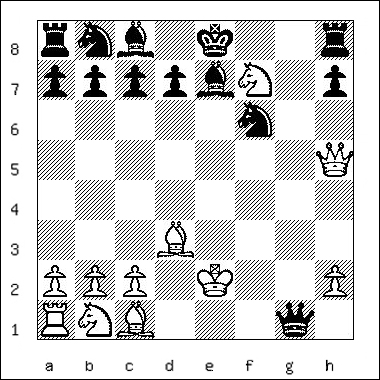 |
| White mates in 3 |
14. Nd6+ Kd8 (14 ... Kf8 15. Qf7#) 15. Qe8+ Nxe8 {or 15...Rxe8} 16. Nf7# a Smothered Mate barely out of the opening. |
| [top] |